The Tools window provides graphical aids that may be used to define processing records and routing records. It is also used to define the graphical paths that entities follow when moving without a path network between locations.
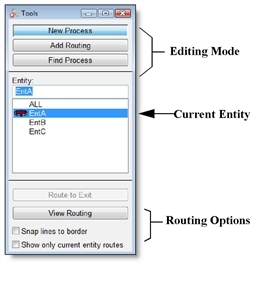
The Tools window, which appears along with the other Processing windows, can define processing in one of two modes, New Process or Add Routing. Each is explained next. Additionally, Find Process Mode is available. To select a mode, click on the desired button. Each of the modes is described on the next page.
In addition to option buttons (New Process, Add Routing, or Find Process) for the process editing mode, the Tools window contains a list of defined entities as well as the reserved word ALL to represent all entity types. The entity in Processing Tools applies to either the process or routing entity, depending on what is currently being defined.
New Process Mode is used to create a new process record. A new process is automatically created for the selected entity each time you click on a location.
This mode should be used if you want to create a process for a particular entity at a location. You may even create multiple processes for the same entity and location if you want to re-route an entity through the same location more than once for additional operations. Once a new process is created, the mode automatically changes to Add Routing mode to enable a routing to be defined for the process.
How to define a new process using the Tools window:
How to delete a process or routing record:
Once a routing path has been defined you may edit the path (regardless of the current mode) by clicking anywhere on the routing path. This selects the path and allows you to change the source or destination of the routing by dragging the beginning or end of the path to a new location. It also allows you to move any intermediate joint in the path to change the shape. You may also click on a path with the right mouse button to create or delete a joint.
If a process is already defined and a location is moved while in the Location module, the connecting leg of any routing lines will also move.
Add routing mode is used to create multiple routings for a single process record. Suppose an entity, EntA, can travel to one of three locations depending on which is available first. Selecting the New Process mode and then defining the entity process causes the entity to travel from one location to another location. Selecting Add Routing mode afterwards allows you to define a different destination location within the same routing block.
How to add additional routings to an existing routing block:
Please Note: To cancel a routing once a rubber-banding line appears, click on the New Process button or click on the originating location.
How to route a current entity to exit:
To find a previously created process for an entity type at a certain location, use Find Process mode.
How to find a process for an entity at a location:
This option always searches forward in the process list. By clearing the entity field in the tools window, the next process for any entity at the location selected is found. If multiple process records exist for the same entity and location, the edit table indexes forward to the next process record each time you click on the location.
The View Routing button in the Processing Tools window causes the process record currently highlighted in the edit table to become centered on the layout.
When you check this option,
When you highlight an entity in the list box, checking this option will show only those routings associated with the entity.

|
© 2012 ProModel Corporation • 556 East Technology Avenue • Orem, UT 84097 • Support: 888-776-6633 • www.promodel.com |